Last year, my wife and I built our twin girls a bunk bed. The bed was their “big” present for Christmas, so it couldn’t simply be a bunk bed. After a whole lot of research and browsing Pinterest, we found a design we really liked on Ana-White.com. It just so happened, that the blog had full plans for it and so we started building it. It was originally going to be the girl’s birthday present (their 4th birthday was in November), but their birthday came and went before we finished. So it became their Christmas present—and they were definitely happy with it.
So this year we decided to build them an art station. Our qualifications were similar to the bunk bed:
- It had to be the coolest art station ever.
- It had to be something that would last them at least 5 years.
- Ideally, we would build it.
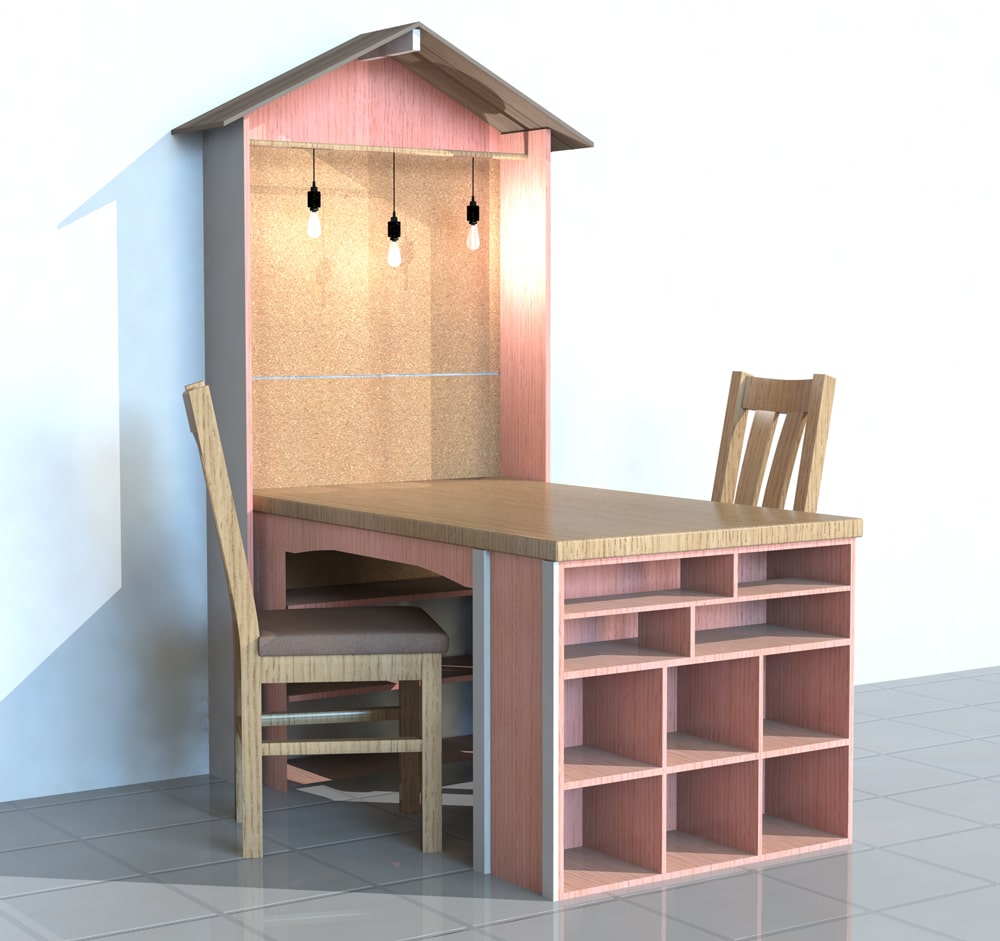
So after hitting pinterest once again, we came up with a basic plan of what we wanted the art station to look like. I put it together in 3D (using Modo) and you can see our initial render of it here.
It actually only took 4 weekends to build (working about 5 hours per weekend) and we’re more than happy with the completed product—which we got done in time for their birthday this year!

As Ana White’s site was generous enough to share the plans for the bunk bed, I’m sharing the plans here for the Ultimate Kid’s Art Station.
Lumber List:
- 1″ x 12″ x 8′ – 7
- 0.75″ x 4′ x 8′ plywood – 1
- .25″ x 4′ x 8′ plywood – 1 (you only need half of this, but I couldn’t find anywhere that sold it in halves)
- 1″ round dowel – 3′
- 3/8 in. x 1-3/4 in. x 8′ Trim – 3 (these are the ones I used)
- Table top*
Tools:
- Chop saw
- Table saw
- Jig saw
- Drill
- 1″ Hole Drill bit (this is the one I used
)
- Kreg Jig Master System
- Brad nailer (hammer is fine)
- Sander (belt/orbital)
Materials:
- Kreg Pockethole Screws
- Brad nails
- Wood glue
- Keda Wood Dye Kit
- Polyurethane
- White paint
Accessories (optional, depending on what you want to do):
- Byholma Baskets from Ikea x 6
- Globe Electric 65208 Vintage Plug in Hanging Pendant Light with Black Woven Cord and Socket (Pack of 3)
- Vintage LED Edison Bulbs
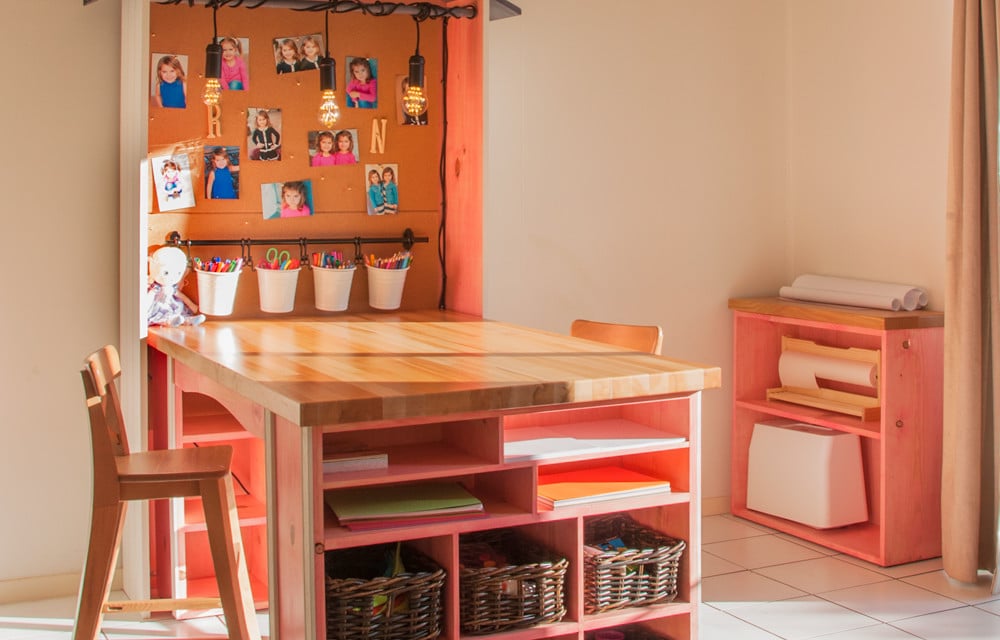
(note: It’s important that you get LED bulbs that will NOT heat up when they are on due to placement of the lights) - 24″x36″ Canvas Cork Bulletin Board
x 2
- Ingolf Junior Chairs x 2 (note: We built the table to adult size, even though our kids are turning 5. These Junior Chairs are perfect in that they lift a child so that they are sitting comfortably on an adult-sized table. When the girls are bigger, we can simply replace the chairs for standard sized ones.
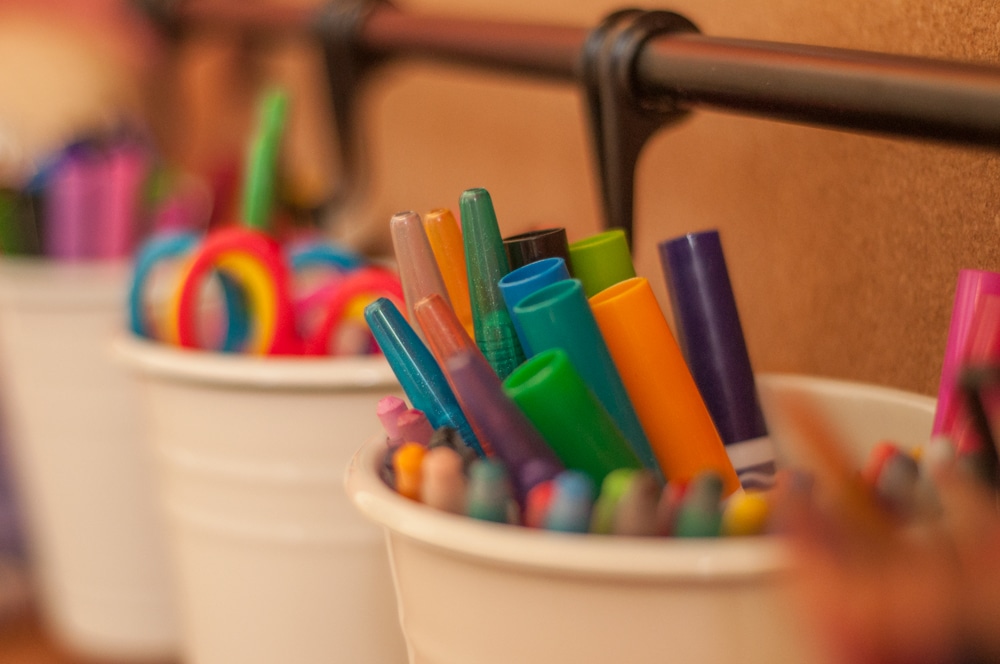
- Ikea FINTORP hanging storage cups x 4
- Ikea FINTORP 31″ black rod
- Ikea FINTORP Black hooks x 2 packs
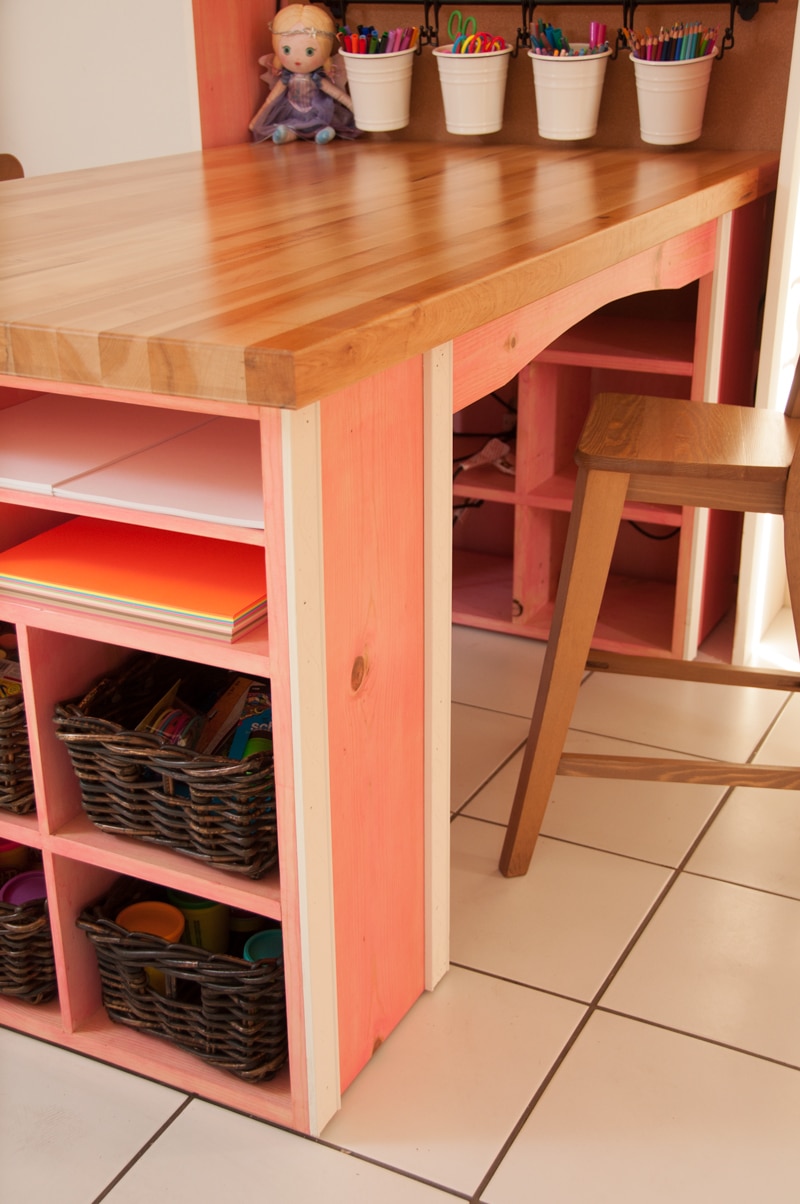
* For us, the tabletop was the “pièce de résistance” of the whole station and so we got a beautiful maple butcher-block table top from Grizzly. The one we bought you can find here. If you’re on a budget, the table top can be made with a nice piece of plywood that’s trimmed with a rounded 1″ x 2″.
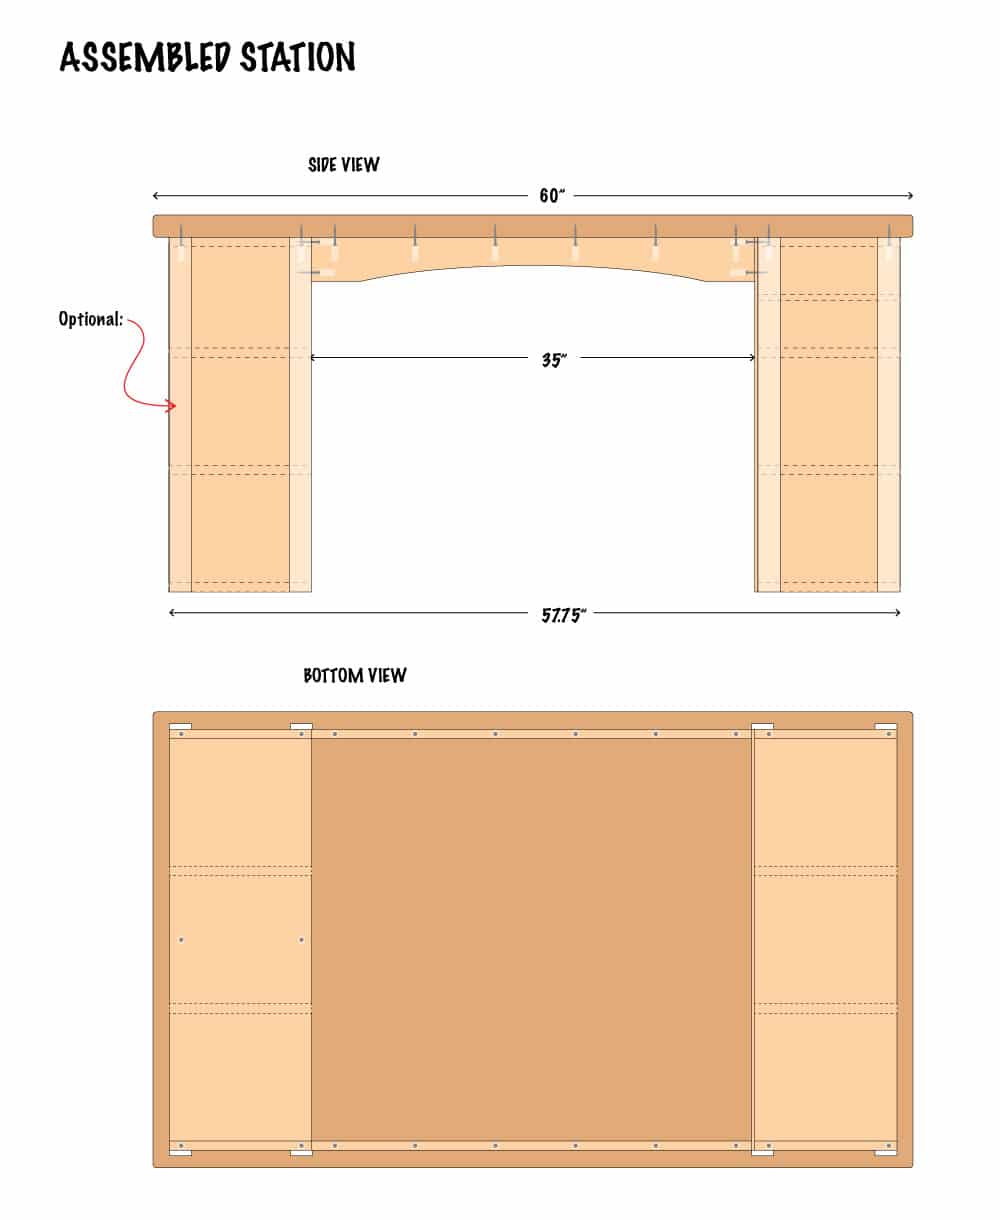
STEP 1: FOOT SIDE SHELF
The first thing I built were the side shelves, which also act as the “legs” to the table top. There are two of these, one that goes against the wall (at the foot of the station) and the other that’s at the head of the station. These are made up entirely of 1″ x 12″ boards (the actual width is closer to 11.25″, even though it is referred to as a 1×12). I had these cut in store (Home Depot), but found I had to straighten a bunch of the cuts when I got home.
Here’s the cultist for the foot shelf (all from 1×12’s):
- 31.75″ – 4 (Note: The width of the blade will make the 31.75″ pieces closer to 31.625″—the important thing is that all of them are exactly the same length)
- 28″ – 2
- 8.5″ – 4
- 8″ – 2
Here’s how they should be assembled:
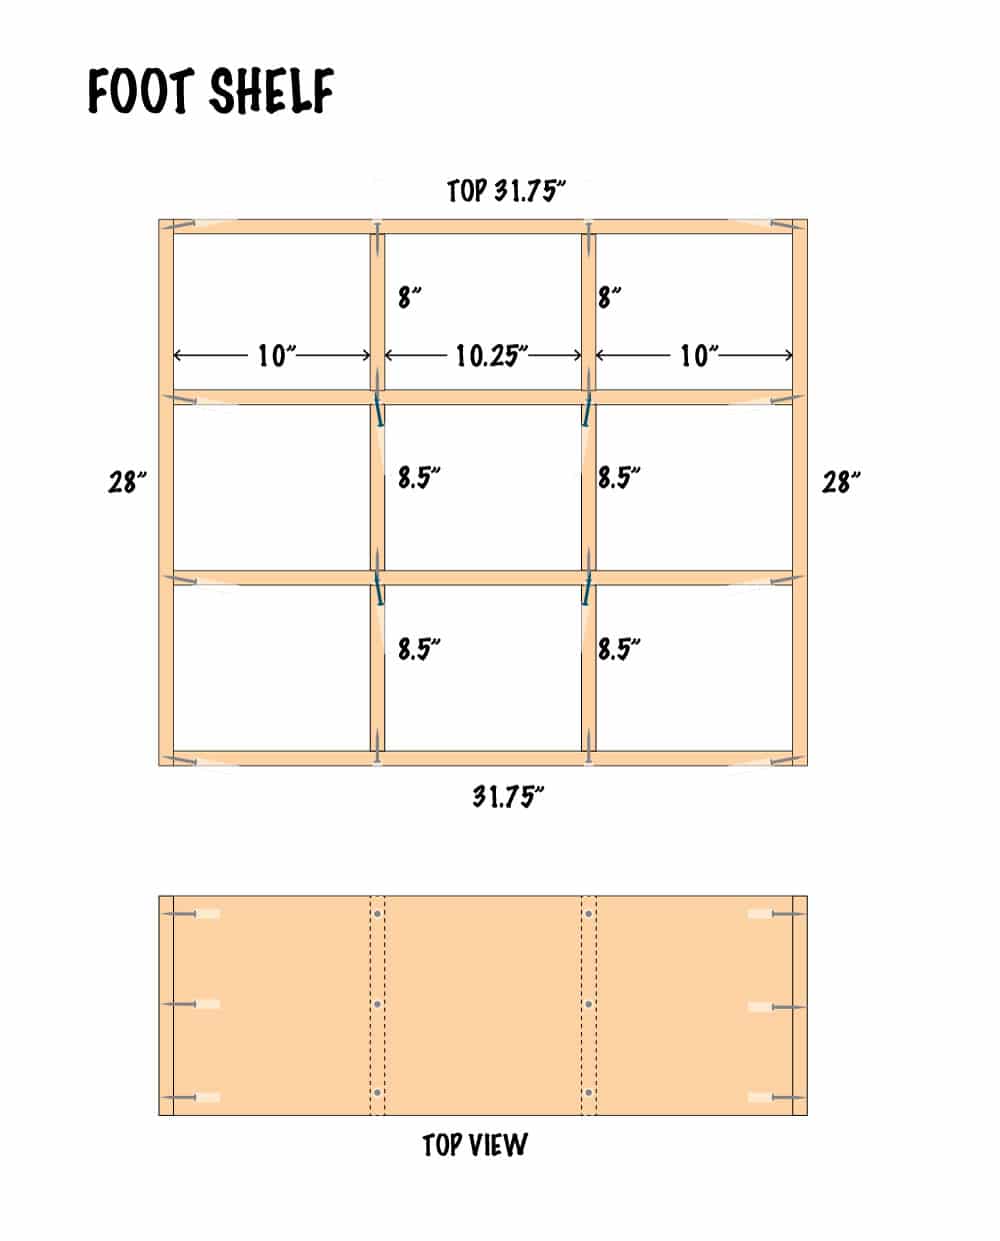
Start with the top board, putting the pocket holes along the top of the board. Use three pocket hole screws going into the side 28″ pieces. Once you have both sides in, you can put in the 8″ middle pieces. I actually used my Kreg drill bit to create countersink holes for the screws and then just used the Kreg self-tapping screws, screwing them in from the top.
With your assembly upside down, work your way “up” toward the bottom of the shelf unit. I ended up using some spacers to make sure my shelves were the same height on both ends. As 1 x 12’s are not finish boards, their width won’t be dead accurate. So decide ahead of time which side will be your “front” and line up all your wood to that face.
When this is put together, stain and polyurethane the whole shelf unit.
STEP 2: HEAD SIDE SHELF
Here’s the cultist for the head side shelf:
- 1 x 23 x 28″ – 2
- 1 x 12 x 31.75 – 4
- 0.5 x 12* x 31.75 – 1
- 0.5 x 12* x 8.5 – 4
- 0.5 x 12* x 31.75 – 1
- 0.25″ plywood – 28 x 33.25″
And this is how all the pieces come together:
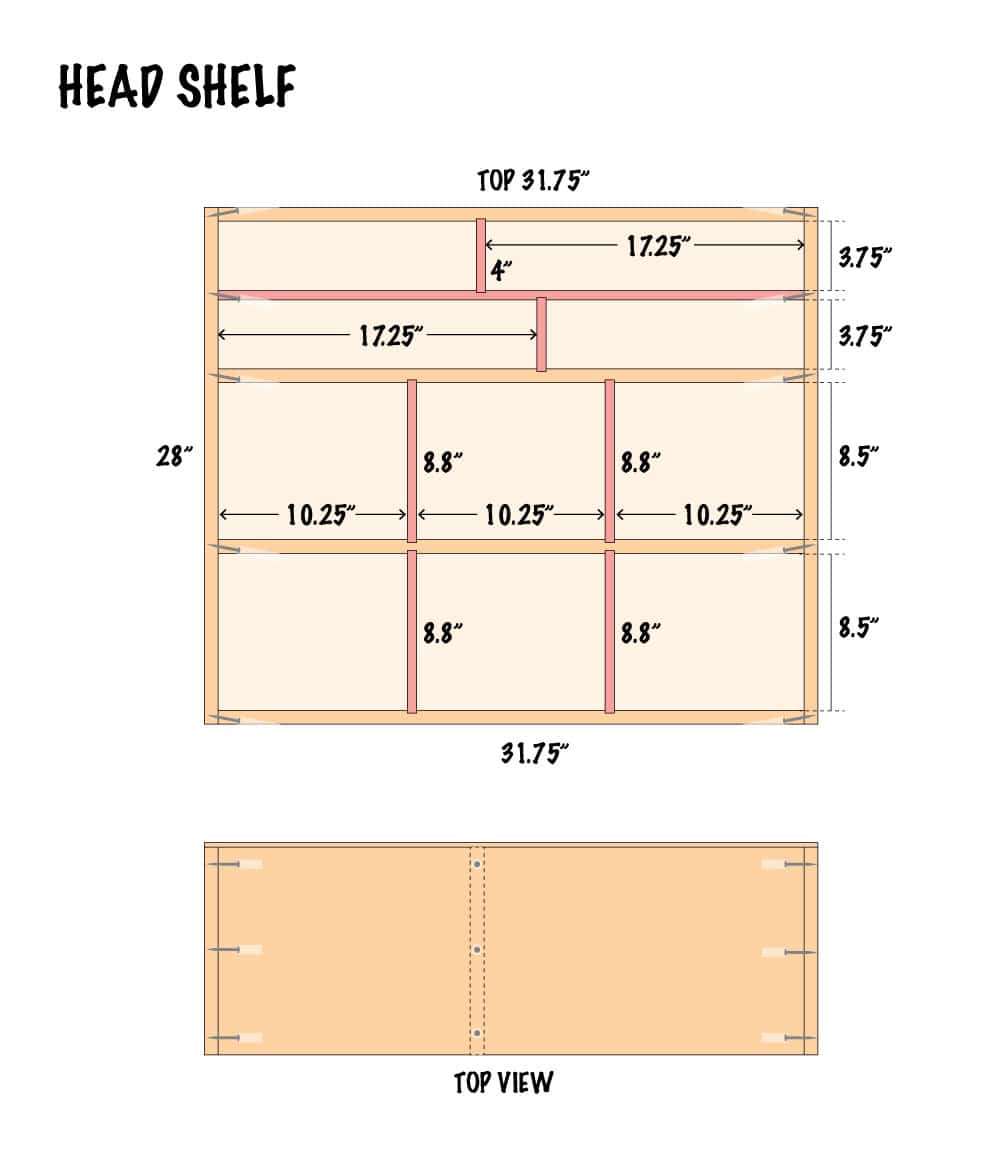
The head side shelf is pretty similar to the foot shelf with a few exceptions:
- The top shelf is divided into two smaller shelves. The center of these are offset so that each shelf includes a cubby holes that’s 17.25″ wide, allowing for storage of ledger (11×17) size paper.
- There is a backing board behind shelf unit.
- Optional: The shelves themselves are thinner.
*So after cutting all the wood, my wife decided we should use a different basket that was ever so slightly thicker than our previously chosen ones. What this meant is that I had to have the shelf cubbies be a bit wider. My only option here was planing one of the 1 x 12’s into a 0.5 x 12. I had them do this at Ganahl Lumber—it cost me an additional $20.
For the head shelf, I actually used dado joints to put in the cubby slot separators. I already had a dado blade and so this ended up being the easier and more accurate method of putting in these pieces—and also looked nicer than having a bunch of exposed pocket holes. But if you don’t have a dado blade, pocket holes will work just fine. If you’re using pocket holes, I’d recommend a screw pattern similar to what I used for the foot side shelf.
The sequence for putting this together is pretty much the same as the foot side shelf—start with the top and with the unit upside down, work your way “up” to the bottom. When the whole thing is put together, you can attach the back panel. We actually did this after staining and polyurethaning and I’d recommend that as it will make those steps easier. To attach the back panel I used a brad nailer, with finishing nails spaced approximately 6″ apart across the edges and across the length of the thicker shelves.
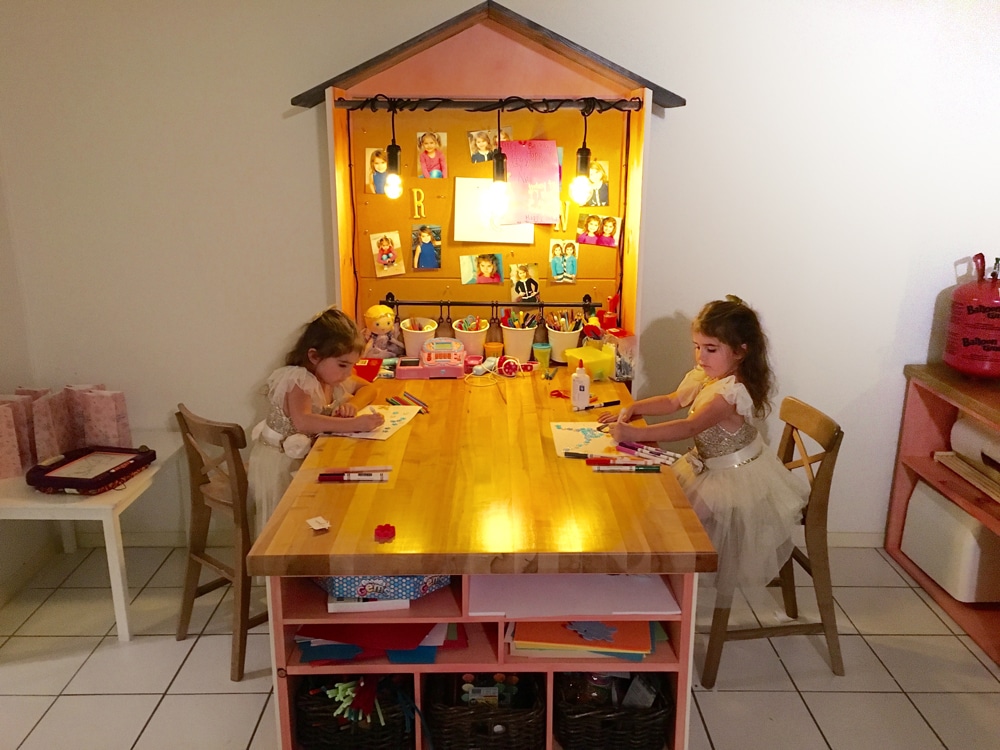
STEP 3: Back Wall & Roof
The back wall stands independent of the Art Station so in reality, it is optional. But we love it because it makes the whole station feel more complete.
Here’s the cultist for the wall and roof:
- 1 x 12 x 67″ – 2 (side walls)
- 1 x 12 x 27 – 2 (roof)
- .75 plywood – 38″ x 75.75″ (back wall)
- 1″ dowel – 38.5″
Note: Quite a few of these cuts have angles on them, so it’s a good idea if you’re getting cuts done at the hardware store, to get everything cut half an inch longer (plywood at 38″ wide is the exception—that’s a big unwieldy cut—so do that one in-store if you can.
Here’s how the back wall comes together:
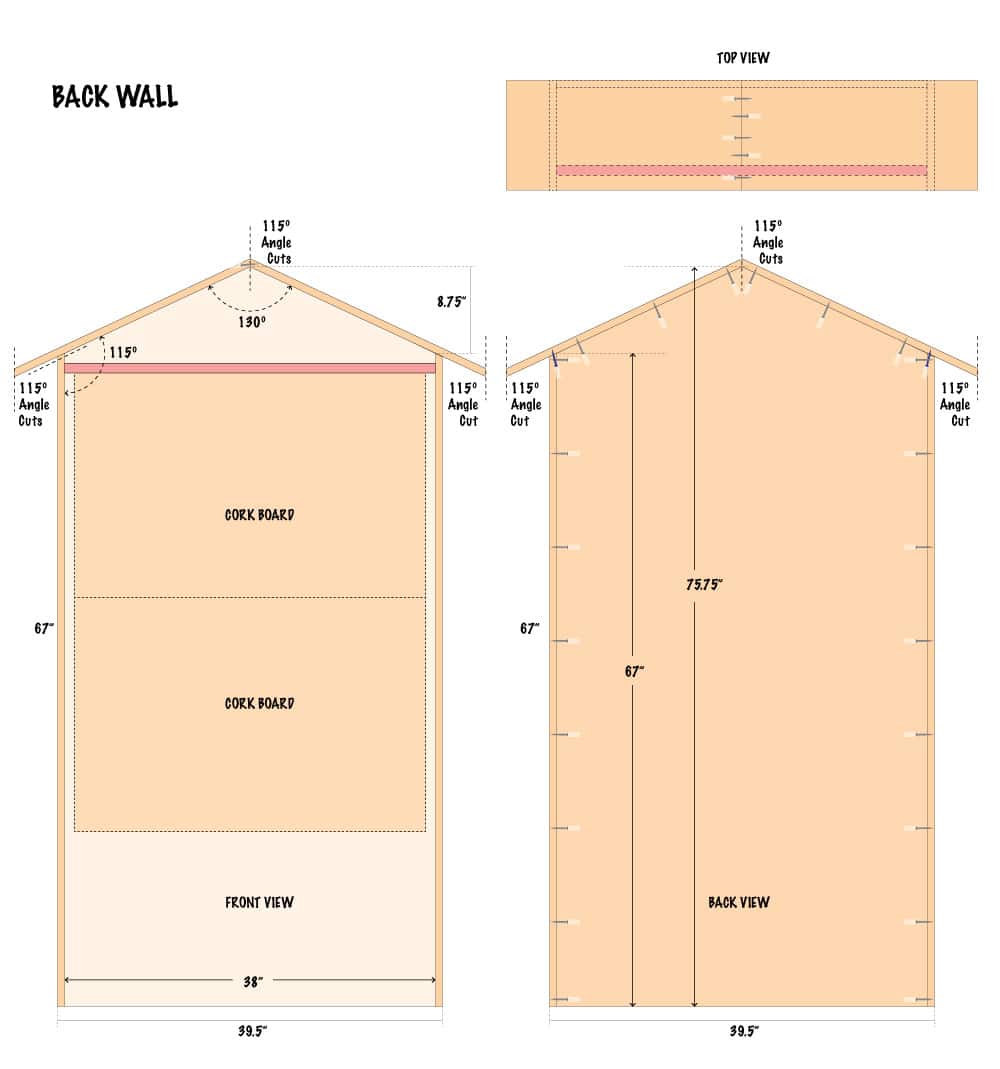
Start with the back wall plywood. Use two angle edges to mark off a 115 degree angle coming off of 67″. Make sure the two lines meet in the middle. If you don’t have an angle edge, you can measure to the center of the board (19″ in from the edge) and mark it at 75.75″ from the bottom. This is the “tip” of your roof angle. Then measure both sides of the wall and mark at 67″. Draw a line that goes from the center 75.75 point down to the 67″ point on each side.
Once cut, you can drill your pocket holes around the outside edge as shown in the diagram.
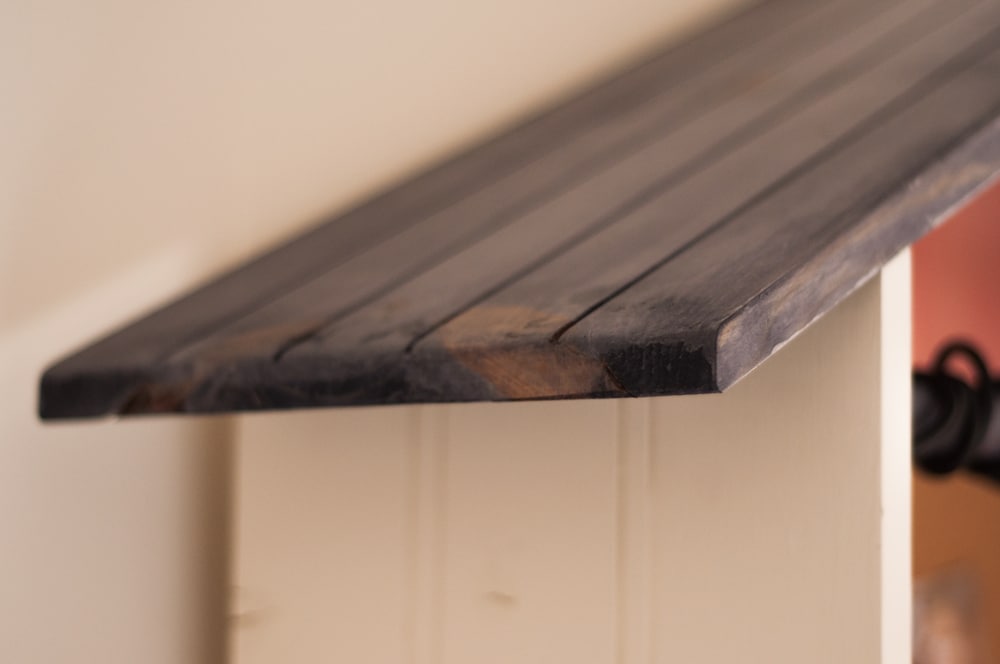
Next put on the side walls. For my art station, I actually used the table saw and put some shallow cuts in both the side walls and the roof to give the appearance of wood paneling or slats. If you want to do this, make sure you do it before putting the walls up.
Use pocket hole screws to fasten the side walls to the back wall. For reinforcement, I used a 2″ L-Bracket at the bottom of each side, but these are not a requirement.
Once the wall was done, I put together the roof. I used pocket holes to put both top pieces together in the center. The piece was still pretty fragile—make sure you carry it holding both pieces of wood. I ended up putting the pocket holes right at the topside. as this will hardly be seen compared to the bottom side.
Once all pieces were painted/stained/polyurethaned, I put the dowel in by drilling a 1/4″ deep 1″ hole on each side and simply dry fitting the dowel in. After that, I put on the roof, which means the dowel will have no way of ever getting out.
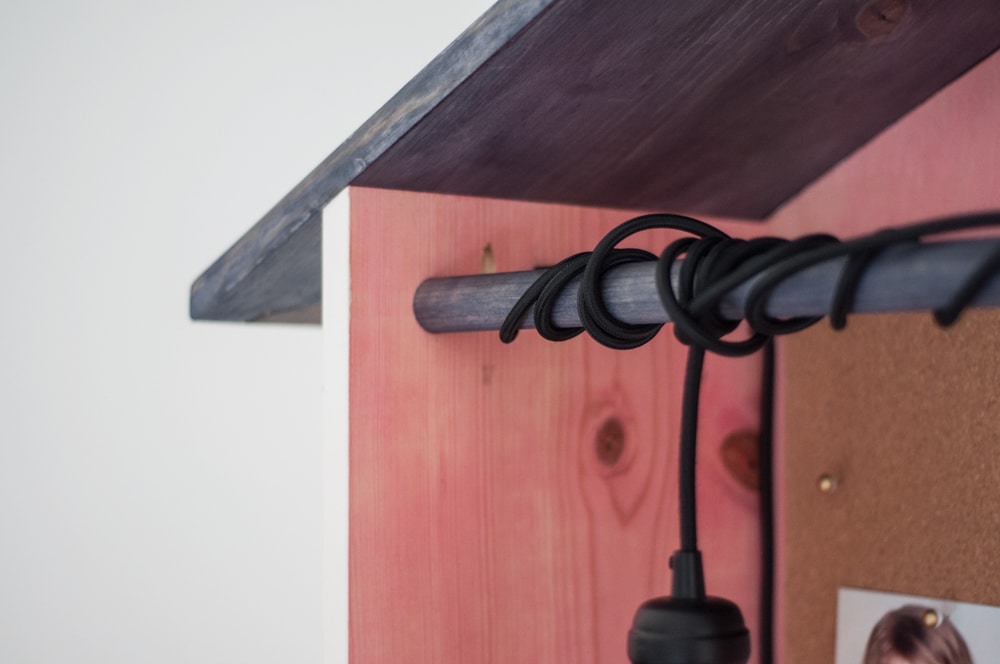
After that, I added the accessories to the back wall—the two pieces of cork board and the Ikea rod and hanging cups. Because of the configuration of the room I put my art station up in, I also had to drill a hole into the bottom center of the back wall, which I matched up to a wall plug. This allowed me to plug in a zip-strip that I’m using to power the lights—and which my wife can use when she does her sewing.
STEP 4: Assembling the table
Cutlist:
- 1 x 4 x 35 – 2
- 3/8 in. x 1-3/4 in. x 28″ Trim – 6 (or 8*)
* For my station, I didn’t trim the edges that are hidden by the wall unit. As mentioned earlier, however, the station can stand alone without the back wall and in that case, you’ll want to trim the edge—requiring 8 trim pieces instead of 6.
I assembled the table in place as I didn’t feel confident moving the whole station around and I’m the only man in the house—the entire station weighs somewhere close to 160 lbs—so it definitely isn’t light.
There are two cross pieces that bridge across the shelf units. These are 1 x 4’s cut to 35″ long. You’ll see in the design that these have an arch in them. I pretty much eyeballed this on the first piece and then used that as a template to do the second. I sanded these quite a bit, rounding both edges so that there was no chance of scraping someone’s legs.
Before attaching these, I also went ahead and drilled all the pocket holes along the inside (to attach the table top).
I used the pocket hole screws to attach all the edges as shown in the diagram. After this was done, I put on the table top. The table top is 60″ by 36″ and should overhang about 1 to 1.5″ inches all around. Measure out each edge until you have the same overhang on all of them, making adjustments as needed. Once you’re certain the overhang is equal on all sides, use pocket holes to screw the table top on. You can see in the diagram where I used pocket hole screws to fasten the top.
For the back, where I was able to get the screw gun into the cubby hole, I added a couple screws from the inside of the cubby straight into the table top.
When everything was put together, I added the trim pieces. These are primarily decorative, but they also served to cover up the pocket screw holes that fastened the side shelves to the top. Alternatively, you could use pocket hole filler pieces, but I liked the look of the trim. I fastened these using a brad nailer. There’s a leaf pattern in the trim that I used and I tried to line up the brad nails with an element of the pattern so that the brad nails would be well hidden.
Finishes/Colors
As mentioned above, I did the painting, staining and polyurethaning throughout the building process where I would have easiest access to all surfaces of the pieces. In broad strokes, I did the foot shelf unit after assembly, the head shelf unit after assembly but before putting on the backing board and the back wall before putting on the roof.
What you use for your colors is up to you. As I put my unit in a room with a white wall and a floor with white tiles and black grout, I liked the idea of a color palette that was black, white, pink and blonde wood.
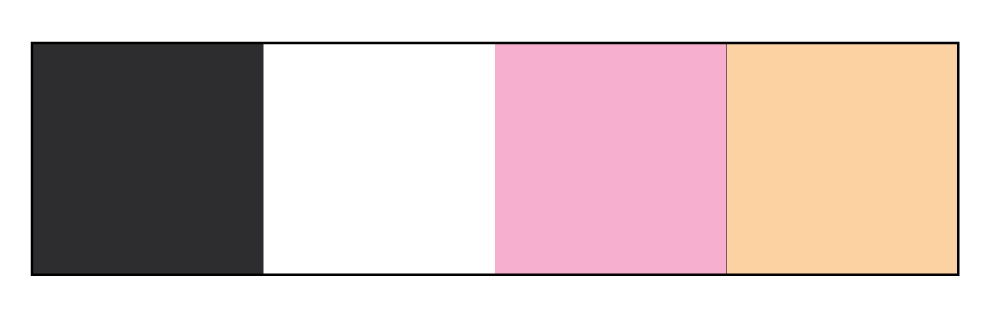
This breaks down as follows:
- Black – Roof, dowel, wicker baskets (a very dark brown), hanging lights and cupholder hardware.
- White – Side walls, trim and cupholders
- Pink – Cubby/shelves, inside of back wall
- Blonde – Table top and cork
For the white, I simply used interior white paint.
For the black and pink, I wanted to retain the wood grain so rather than using paint, I stained the wood using the Keda Wood Dye kit. This video gave me some basic direction on how to create the pink, although I found I had to dilute it even more than he does in the video in order to get the color I wanted. Also note that the polyurethane will give a definite “yellowing” to the finished wood, so think with that when you’re staining.
Summary and Notes
The whole project took about 25 hours spread over 4 weekends. You’ll notice that I also had a side shelf. This was an additional 5 or 6 hours. I built this to hold my wife’s sewing machine and a paper roll that didn’t otherwise fit. If I were to do it all again, I might make room for these in the foot shelf rather than cubby holes which I’m not currently using.
The girls are already using the table and it’s great to see them on it.
If you have any questions, put them in the comments section and I’ll answer them.


I just have to say that this is so amazing and THANK YOU for sharing!!