
“A good picture is like the first line of a story, the viewer would like to know how the tale continues.” – Thomas Herbrich
Putting various photos together to create a new, unique image is an essential skill of any designer. Photo compositing can range from the simple (changing out a sky or background) to the complex (creating an entirely new image from a collection of different photos). The reality is that you will be hard-pressed to find a design project that doesn’t require some form of photo compositing. Even if you aren’t creating a fantasy scene, you may be required to add a product to a background or combine two elements into a single image. However large or small your photo compositing project, there are certain basic principles that will help get you the best results.

The bulk of photo composites are subtle—such as adding branding to an image, or a product to a background.
It should be mentioned here that the best result of any photo compositing project is the absolute transparency of your work. Every person who sees the image should believe that the image was never more than a single scene. No one is amazed at some fake wings pasted onto a photo of a girl. But a photo of a girl with wings… well, that’s a different story. Here are 7 “golden rules” for photo compositing, gleaned from 15 years of experience and working with all manner of artists and designers in the field.
1. Match up your elements.
Perspective, Lighting, Resolution.
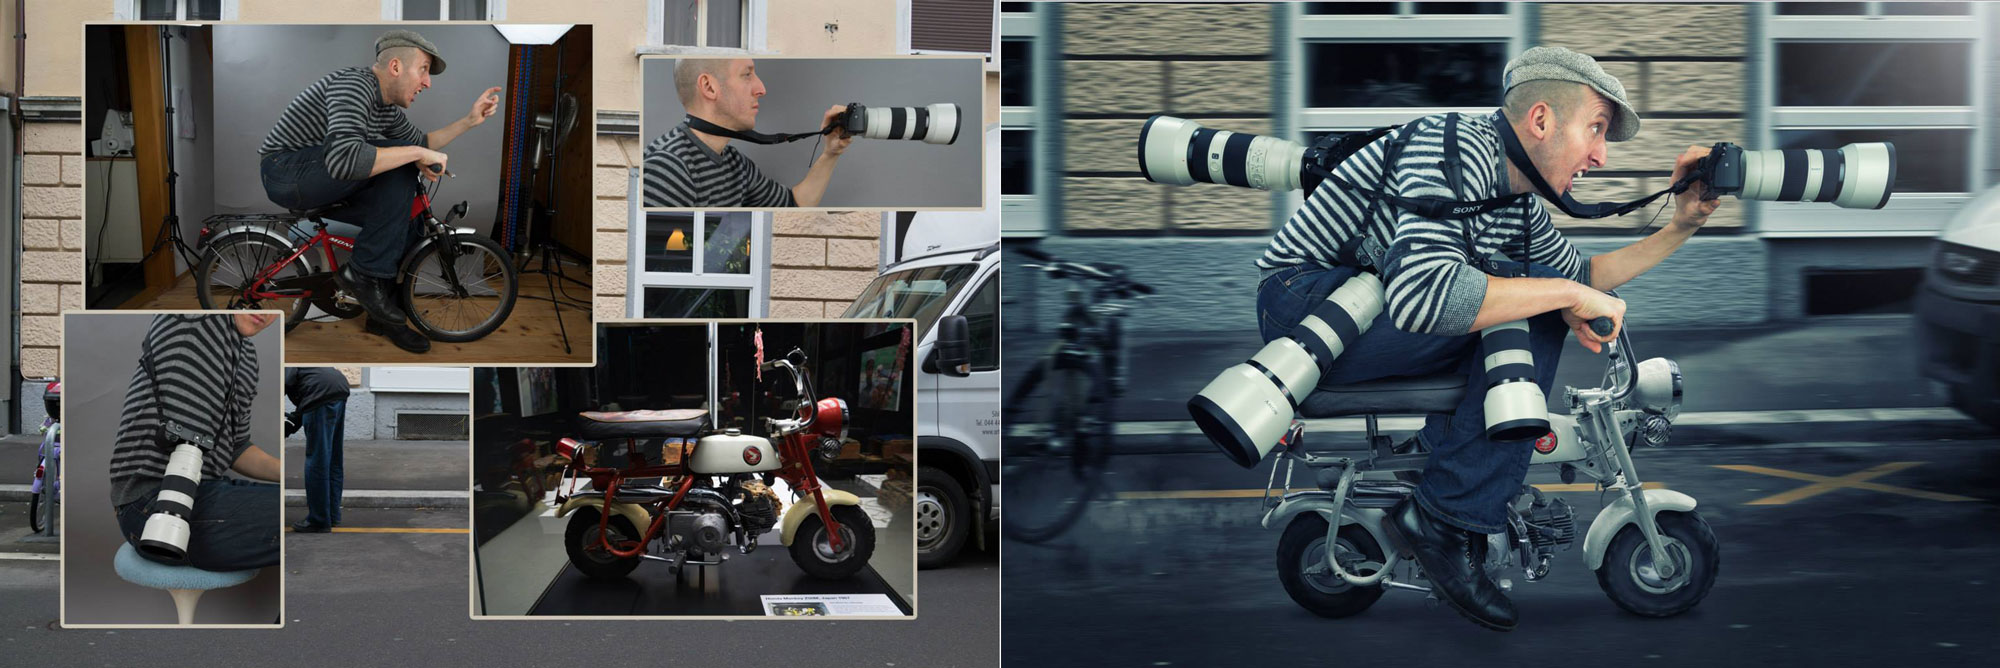
This is the first step and one of the most important. If your background is a photo taken at night, you’re going to have a much better time with a foreground element also photographed at night. If your foreground element has high contrast light (noon on a clear day), then your background shouldn’t be lit with ambient light. It’s also very important that perspective matches between images. Different perspectives in an image is a tell-tale sign of photoshop manipulation. This extends to scale, texture, resolution and film grain. While some of these elements can be made consistent through the photo compositing process, the better you can match up elements to begin with, the better off you will be. For this very reason you will find that the top photo composite artists are photographers—by taking your own photographs you can match lighting and perspective between all your elements.
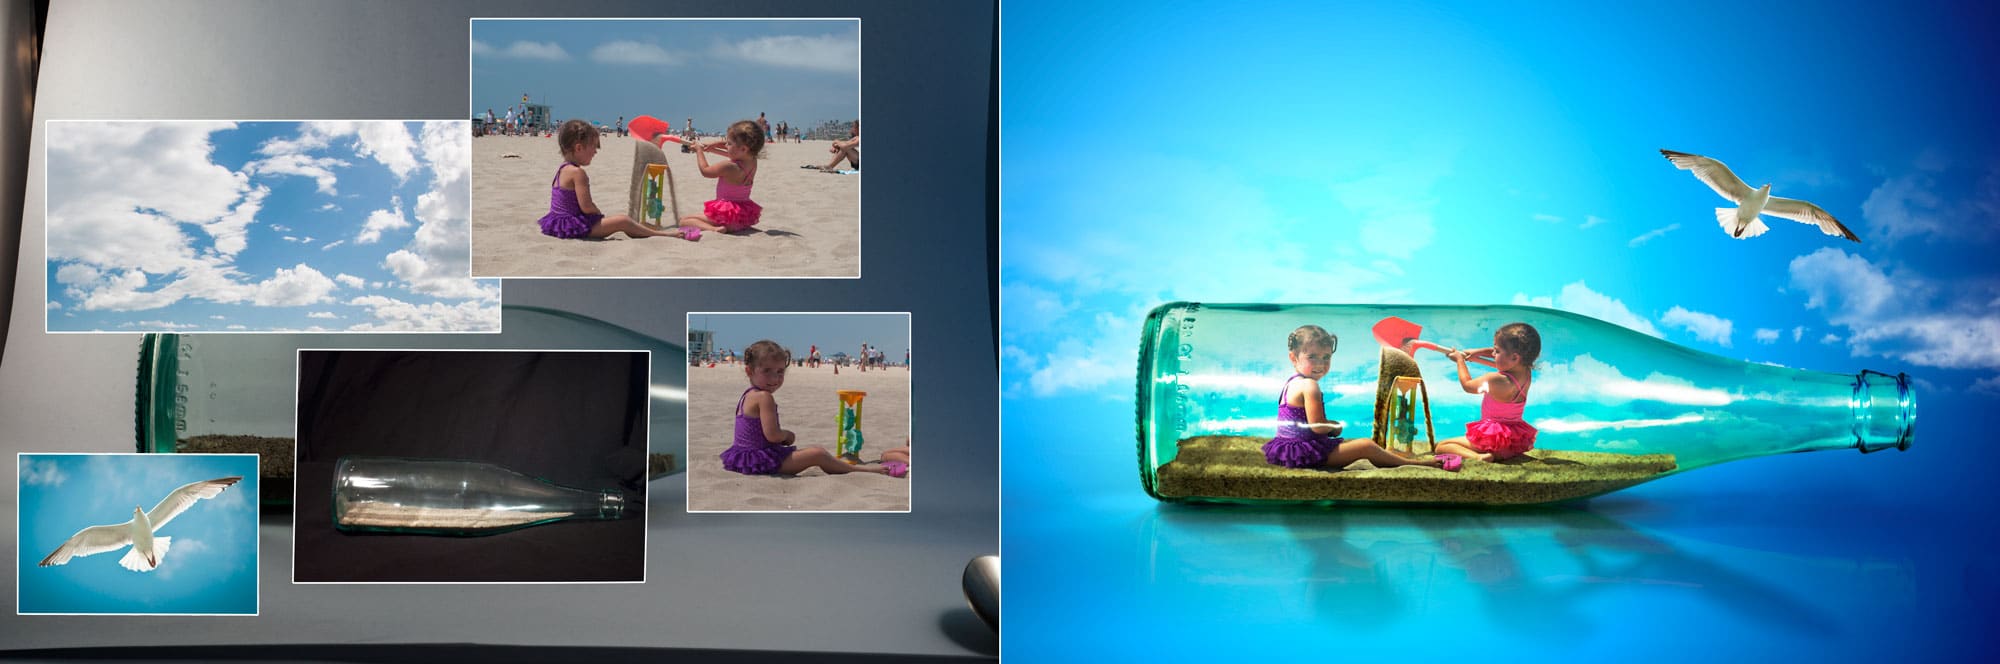
For this image, all the elements are lit with natural noon light. The bottle was taken with a strong top light so that it would match up with the rest of the elements.
This image, created by the talented John Wilhelm, shows the various elements that were used to put together the composite.

Every element is an underwater photograph that is top lit to match up with the primary subject of the photo.
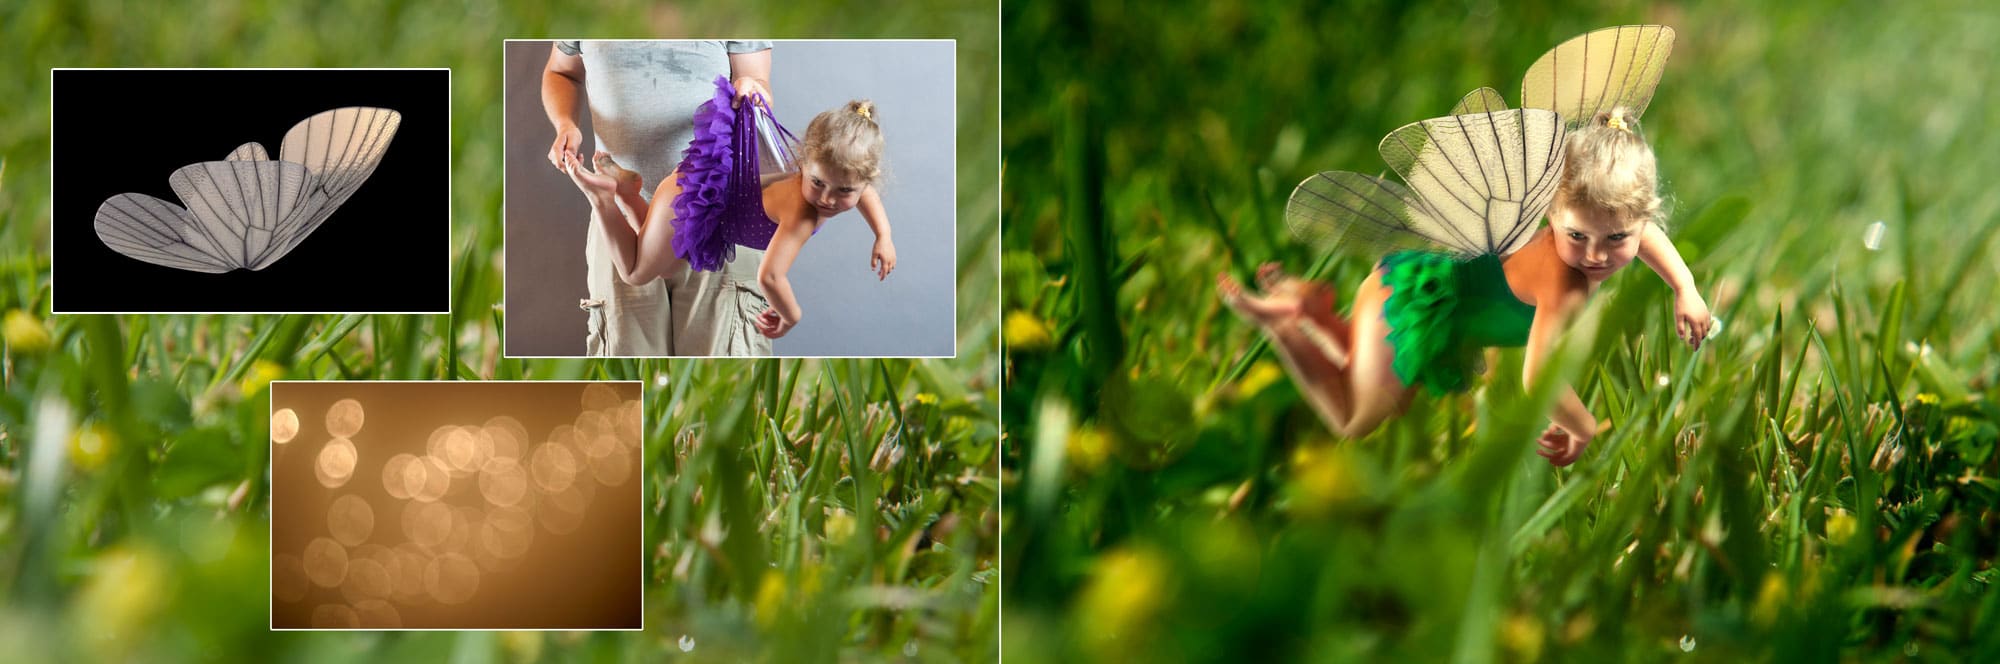
This uses a small amount of images but you will see that the wings were rendered to match the perspective and angle of the photograph.
As a recap, these are the things to look for when gathering elements to make your composition:
- Lighting quality and contrast (sharp light, spot light, ambient light, back light, etc.)
- Lighting direction/shadow direction (light coming from above, from the left, front, etc.)
- Perspective—unless your element is a sphere, it will have a visual perspective. This needs to match your source image/background.
- Scale—relative scale is important. While you can easily shrink an element, the opposite is not true. Your source material should not be smaller than you intend on using it as scaling it up will cause degradation. Level of detail also comes into play—the level of detail needs to be consistent throughout the final image.
- Resolution (see above on scale)
- Texture/grain—while there are tricks to reduce or add grain, you’re better off starting with images that have a similar amount (or lack) of grain/texture.
2. Good masks make for good composites.
Bad masks are the sign of an amateur.
There are is a large subset of skills that come into play when doing a photo composite—color grading, artistic composition, lighting, digital painting, etc. Of all these, the most important is masking. A mask will make or break your composite. A good mask is seamless while a bad mask is very evident and screams “cut out.” Photoshop’s suite of tools for masking continues to improve and there are third party plug-ins that also help the process. However, I would urge designers to become skilled in doing it the old-fashioned way—with the pen and paint tools and using channels. At that point, using the newer tools simply improve and speed up the process.

A seamless mask makes for a seamless composition. Spend time to make a good mask as it will go a long way in making a good photo composite.

Masking is your golden ticket to taking separate elements and putting them into an entirely new setting. (Disregard the sweat on my shirt; it took many attempts at getting a good photo and I had to operate the camera remote with my other arm…)
3. Lighting is everything.
Don’t let it be accidental.
I already mentioned above the importance of having consistent lighting between your elements. This is just as important when you have your elements put together. Adjust the lighting of your various elements—foreground and background—so that they perceptually have the same lighting. This may mean using your curves and other adjustment layers to add or reduce contrast. It may also mean using a brush to add highlights or glowing edges to elements. It also means changing the color of your highlights to match the image light source.

Note the color of the highlights on the woman’s hair and on the jacket as well as across the rest of the image, which have all been adjusted to match the new “sunset” lighting of the background.
One particular thing to look for is the black point of your elements. As elements are further away from the camera, they will have a certain amount of “atmosphere” on top of them. This will make the black less and less pure. Your black point is essentially how dark your black is. The closer an element is to the camera, the darker it’s black will be. This can actually be extended to the full contrast of an element. The closer an element is to the camera, the higher the contrast will be. The further away, the less the contrast will be.

Left: Note the difference the black point makes. The soldier on the left has a black point matched to the background. The other two both have too dark a black point. Right: Here you can see that the black point becomes darker as it gets closer to the camera.
Finally, lighting extends to adding lights and light flares to your scene. JJ Abrams is the master of lens flares and I’m not mad at him for it. Lens flares do an excellent job of “melting” different elements together. Because flares are a “defect” that occurs in the camera, the subconscious impression you purvey with a lens flare is that the scene was captured by a camera and not put together in Photoshop. The one caveat to that is that the built-in lens flares provided in Photoshop are terrible. You will need to find a lens pack online or get the Knoll Light Factory. Here’s one pack I found but I’m sure you can find more. 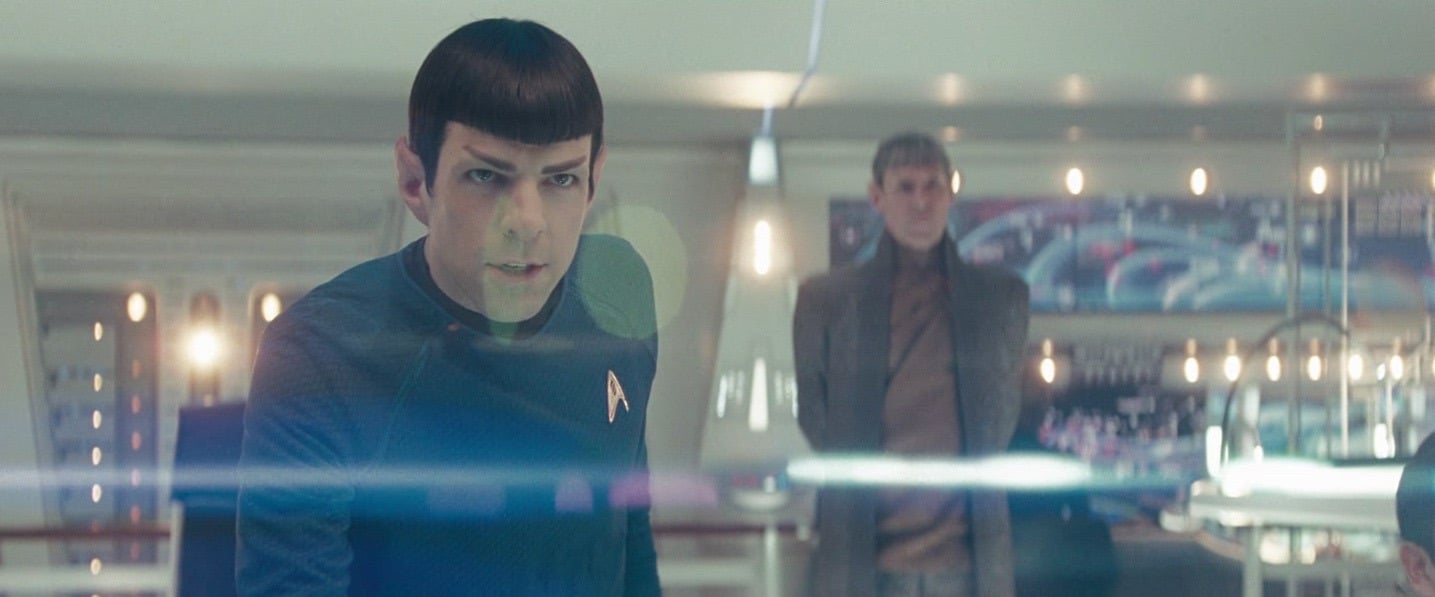
4. Add uniformity in color.
Color is like the rug that holds the room together.
As you’re putting together your design, try to keep all colors adjusted to a neutral white balance. In simple terms, greys should be grey. This gives all your elements a somewhat consistent color balance to begin with. Only after you have your composite together do you want to color balance the image. Depending on your image, you want to give it a cast—either warm or cool. By doing it across the whole image, you make disparate elements come together and feel much more cohesive.

Here you can see a before and after. On the left are all the elements composed but not color graded. On the right, you can see the same composite with color grading.

In this image, by the talented Thomas Heinrich, you can see that the whole image has been given a purple/magenta cast. The result is a much more integrated composite.
5. Layers and Blending Modes are your friends.
Essentially, a photo composite is cutout photos layered on top of each other.
 Before the days of computers, photo compositing was done by hand—literally photos were cut up with a razor blade and photos were taken with multiple exposures. The results weren’t that great by today’s standards, but for their time they were “magic” and led to some famous hoaxes. (This article has a few examples.) The introduction of layers in Photoshop 3.0 in 1994 opened the door for virtually any photographer or artist with a computer, photo scanner (remember, this was before digital cameras were widely available) and a copy of Photoshop to do photo compositing. And while Photoshop is now on version 15, layers and their blending modes are still the most fundamental building block to any photo composite. If you use Photoshop, you should be familiar with the Overlay and Softlight blending modes. These are your friend. Unlike Multiply and Screen, which are “one-sided” blending modes (they make something darker or lighter), Overlay does both—areas of the top layer (the overlay layer) that are lighter than the background layer make the background image lighter and areas that are darker make the background image darker. Softlight does the same thing as overlay, but more subtly. Using these two blending modes, you can add texture, grain, light, color and contrast to your image. And because you are doing it on top of the composited elements, it works to bring the whole image together. One concept artist I worked with used this method to do almost miraculous things—adding panels to spaceships, dash panels to cars, etc. Experiment with these blending modes and you’ll be surprised at how useful they actually are.

Here you can see texture added to a composite using overlay and soft light.
6. The middle is the sweet spot.
Have a foreground, a middle and a background. Put your subject in the middle.
If you’re adding an element into a background, place it “in the middle” instead of on top. Your composite should have a foreground, a background and a middle. The middle is where your subject should be. Not all backgrounds lend themselves to a “middle” but this simply means that you need to become more inventive. It may require that you composite an additional foreground element so that your subject falls into the middle of your composition. Common cheats are fog, fire, debris, rain, snow and light flares—by making these foreground elements, it pushes your subject further into the composition and creates a much more realistic looking scene. Here’s a series of three composites by the talented Peter Jaworowski that show this principle really well. By putting elements in front and behind the subject (bottle), the whole thing feels much more cohesive.


In this series by SeventhStreet Studio, you can see how light flares and butterflies were added to the foreground in order to push the subject of the composition further into the scene. The result is an almost magical looking photo that, in reality, is just photos layered on top of each other. 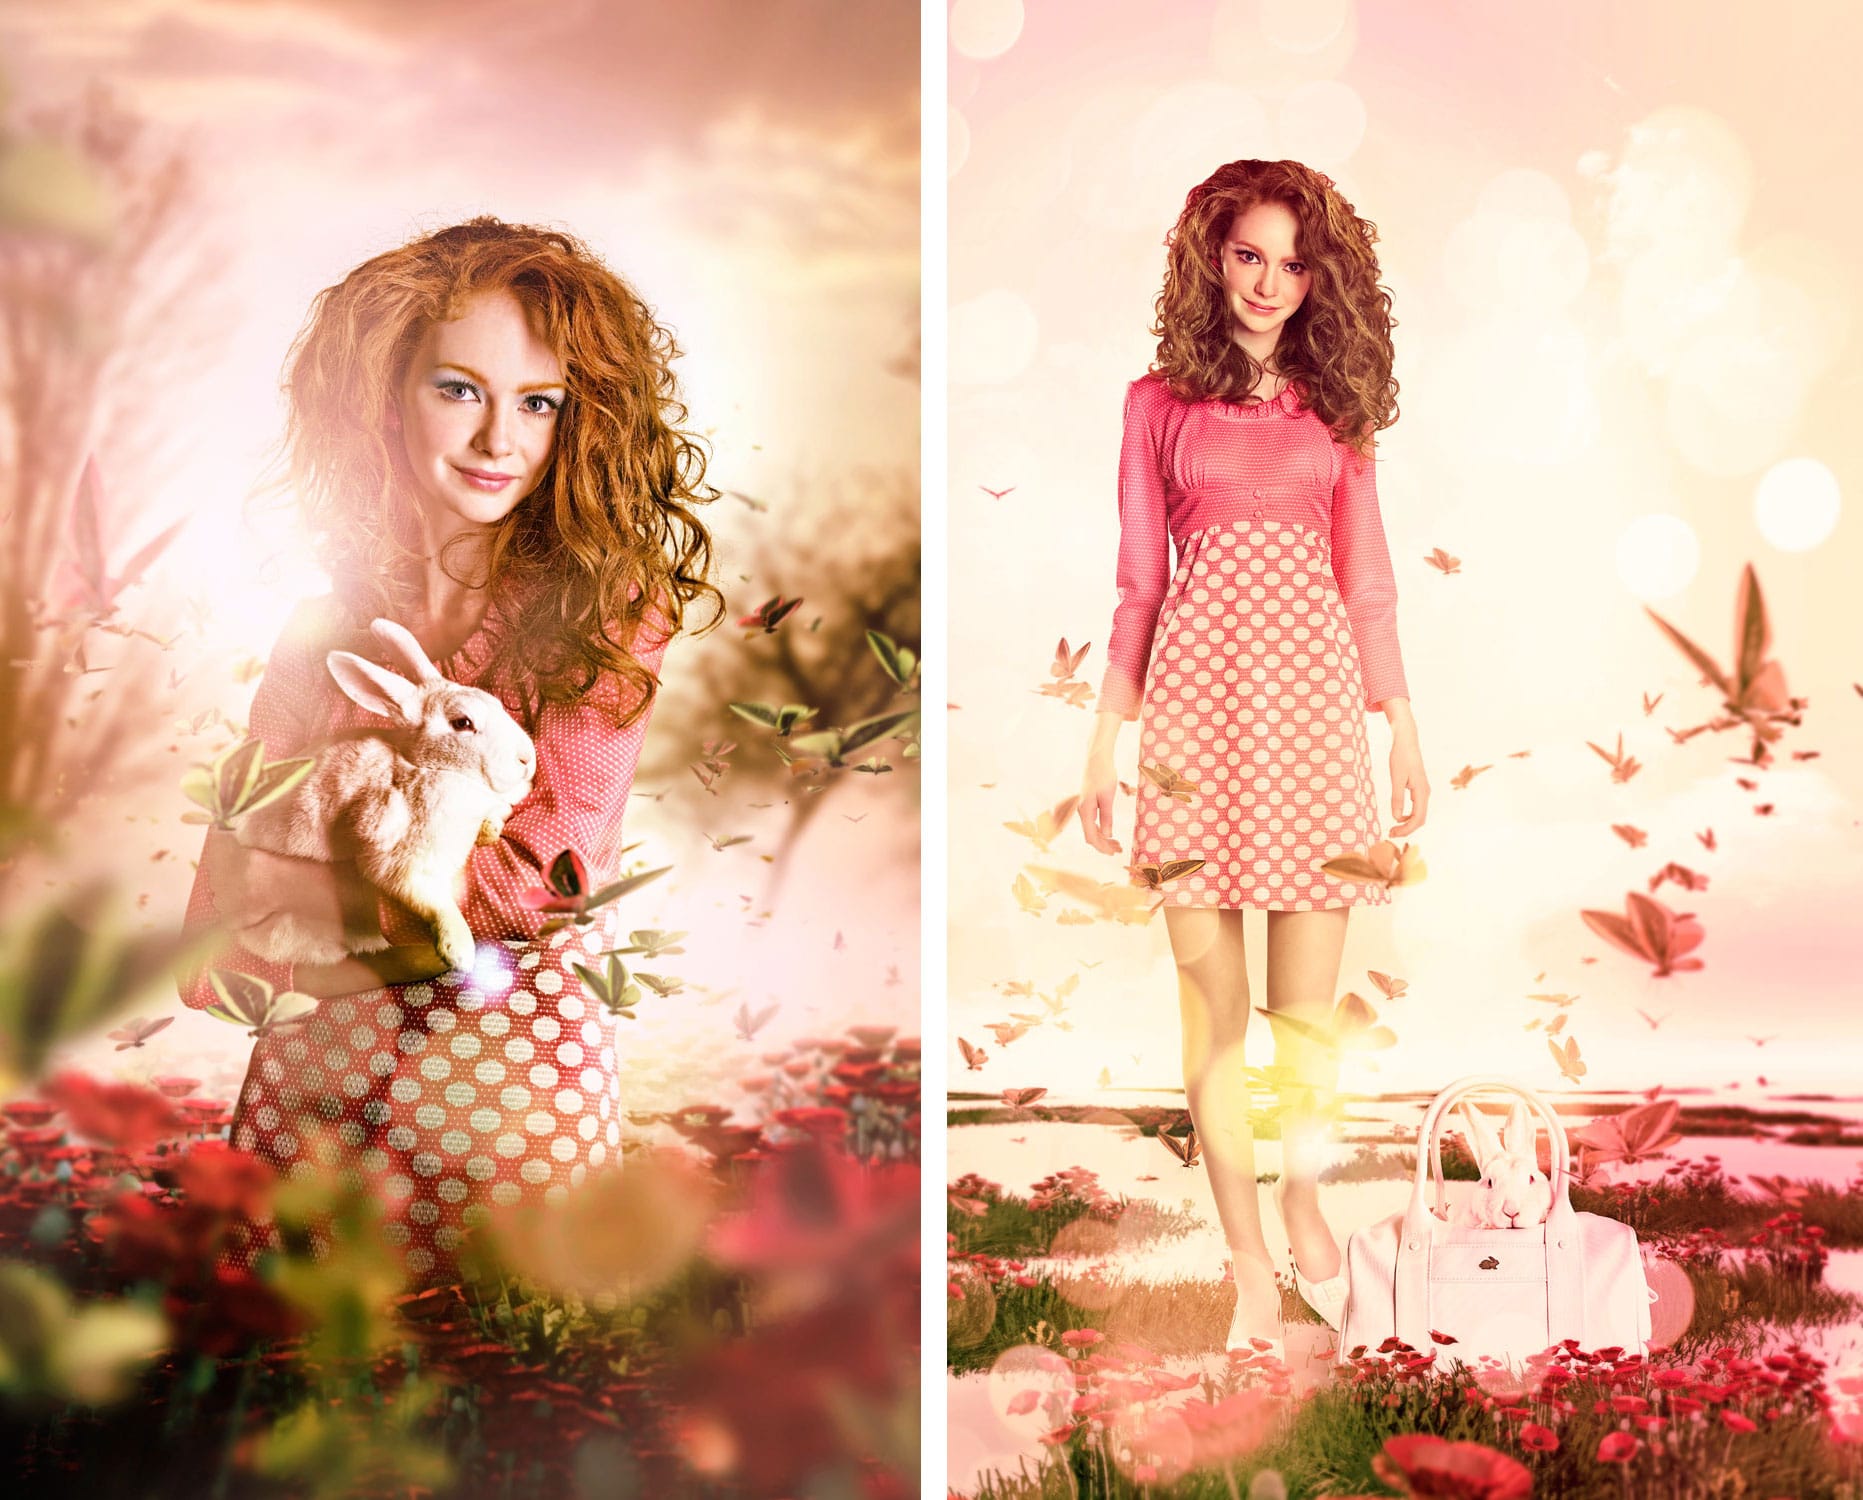
7. Direct attention.
Beauty is in the eye of the beholder. Show it where to look.
This obviously applies to any design—it could almost be stated as a purpose of design. But when it comes to photo composites, you can direct attention away from areas where the compositing may be more obvious toward the areas where you want your audience to look. A good example is where feet touch the ground. This is an area that is not easy to fake and so directing attention away from it by either cropping it out or darkening it will go a long way toward making the whole image work better. In the example below, I did take a few minutes to make the feet touching the ground look realistic, but darkening it and focusing on the soldier through a strong vignette makes the whole image work quite a bit better. 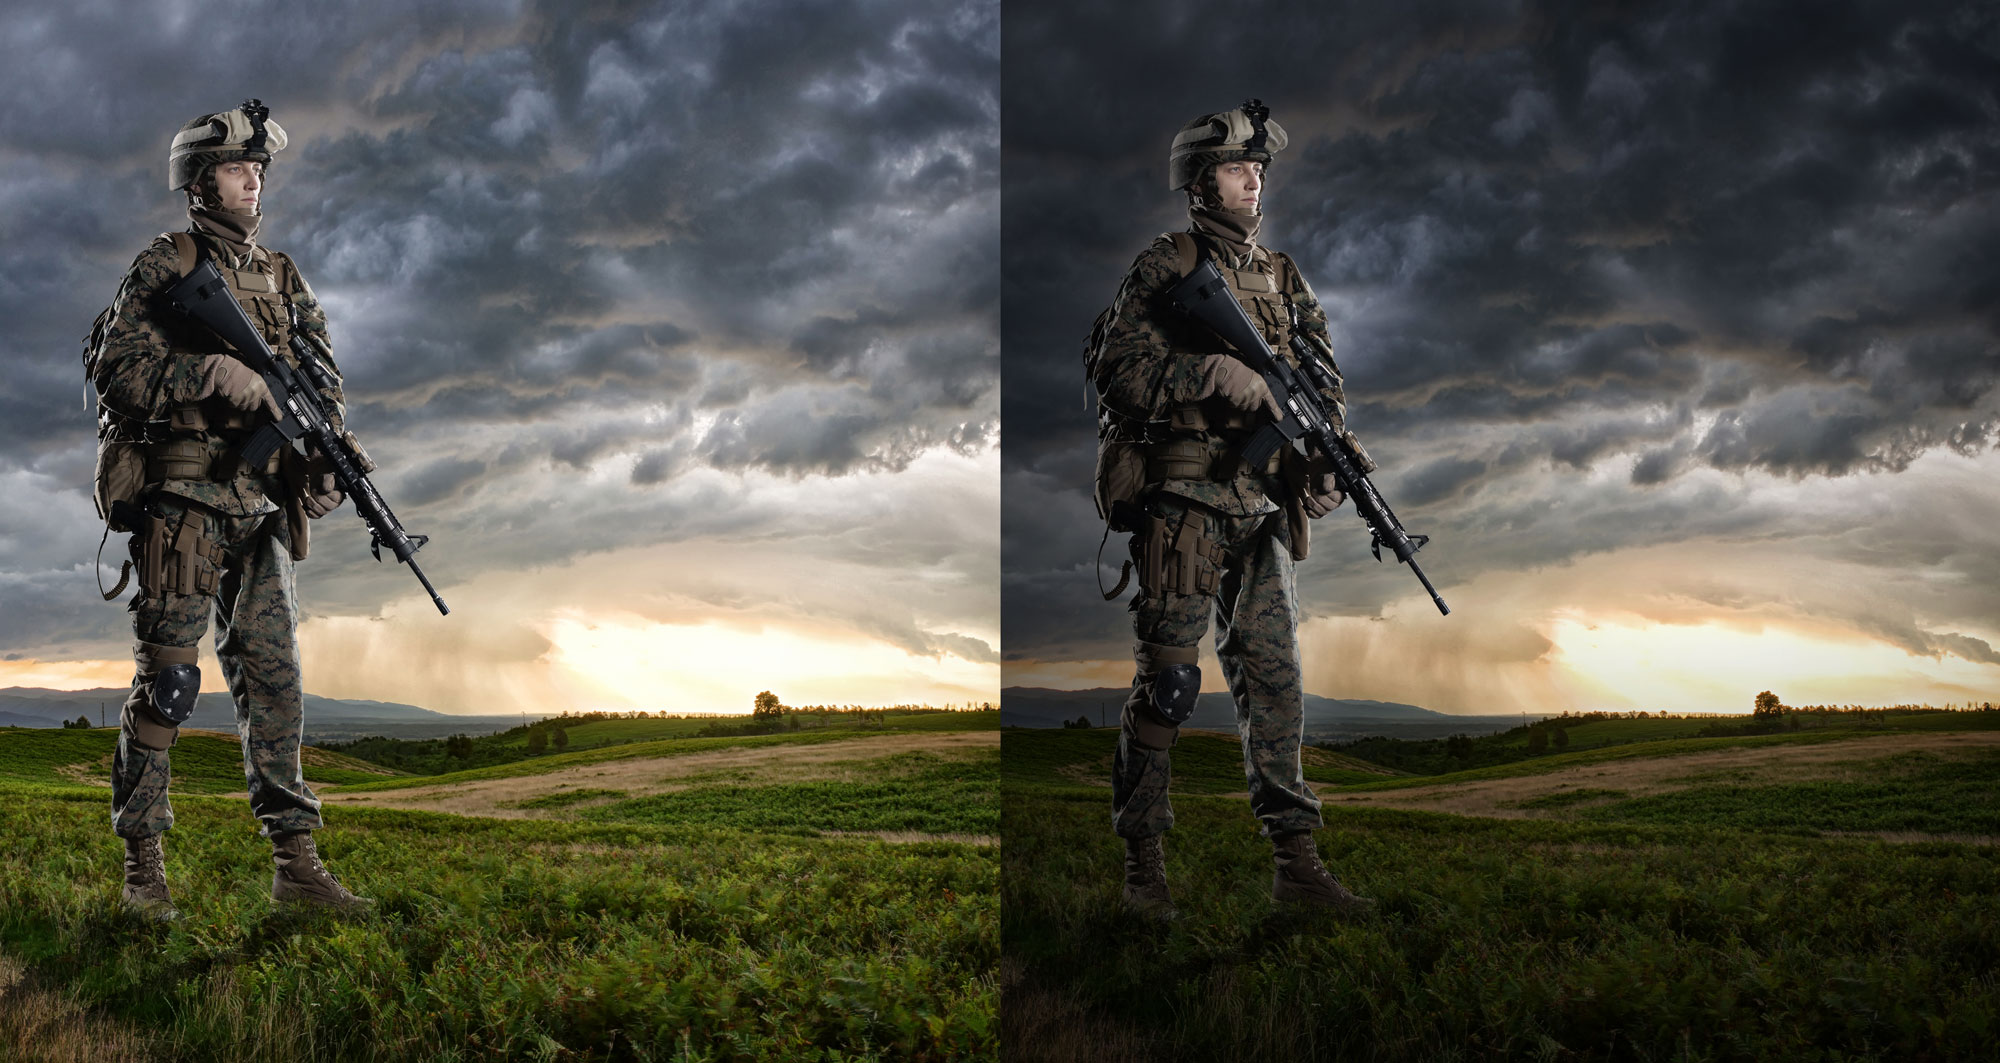
Summary
Using the above, you can make any photo composite better. Always remember that the end result of a good photo composite is that people can’t tell it’s a photo composite. For most projects, this simply means that people think the image is a single photo. For more complex photo composite projects, it means creating that sense of awe you felt as a child when seeing a magician perform a trick for the first time. As Thomas Heinrich says, “They should surprise, bring astonishment and a slight grin.” As a final statement on photo composites, there is a prerequisite to any good photo composite not covered above — a bright idea. Without a bright idea, you’re just putting photos together. This is true of all design and is best summed up by German graphic designer Thomas Manss “To create a memorable design you need to start with a thought that’s worth remembering.” Many photo composites serve only as a small part to a larger whole (such as putting a product into a background), but when you are doing a photo composite as a piece of art in and of itself, then starting with a good idea is a necessity. Bright ideas and strategies to come up with them is fodder for another article (or series of articles) so I haven’t covered it here.

A photo composite by the talented Thomas Herbrich.
Resources
If you are a beginner to photo compositing, there are excellent tutorials available which take you through photo compositing projects. By doing the steps of the photo composite you learn the skills needed to do one of your own.
- PhotoSerge Fantasy Compositing Course: This is a course I put together on photo compositing. It takes you through all steps starting from the photography and going through to having a fully composited image. It’s only $17 but you can get it for cheaper by subscribing to PhotoSerge.com—members get regular discounts on all courses.
- Lynda.com: Lynda offers numerous courses on Photoshop and compositing. I haven’t checked them all out myself, but a quick search showed this one, which seems to be a good primer on the subject: Lynda.com’s Introduction to Photo Compositing Course
- Phlearn.com: Similar to PhotoSerge, phlearn offers comprehensive courses that take you through a specific project. You learn the skills while doing the project (which I find to be the best way to learn). This course follows most of the principles here: Island of Morel Photo Compositing Course
- Adobe.com: Adobe has a good tutorial section for Photoshop that covers a lot of the necessary techniques needed to do effective photo composites.
- MightyDeals.com: This sight isn’t specific to tutorials, however it’s an excellent site to keep your eye on. Particularly the courses tab, which offer comprehensive courses at low cost.
Inspiration
There are a lot of great photo composite artists out there. Just do an internet search for “photo composite” and “photo manipulation”— you’ll find a whole bunch. But here are a few “stand outs” that I’ve run across. If there are others, please put a link to their portfolio in the comments. If I agree that they are great, I’ll add them to this list.
- Thomas Herbrich: A photographer and photo compositor, Thomas’ work is amazing on many levels. Excellent attention to detail and great ideas. His mantra is “Surprise yourself, and your audience!” and this shows in his work. His site took a while to load (I almost thought it was broken) but once you’re in, you won’t be disappointed.
- John Wilhelm: Almost all of his photo composites use his daughters as the primary subject, which I think is great because it shows you that it doesn’t require a big budget to do great photo composites—a camera, friends or family as models and a copy of Photoshop. His work is amazing. I also suggest visiting his Facebook page, where he shows a lot of before-and-afters and works-in-progress. Studying how he does his composites is a learning process in itself.
- Tim Tadder: Probably my favorite on this list, Tim is a photographer who does excellent photo composites. Each one is a project and the end results are a testament to his craft. His site has a lot of great photo composites but you can also find some of his “behind the scenes” on behance.
- Erik Johansson: His composites are excellent but what sets him apart is his very intriguing ideas. His photo composites are reminiscent of surrealist Dali paintings.
- Peter Jaworowski: Most of his work is commercial, but nonetheless amazing. He is the Executive Creative Director at Ars Thanea. You can also see a lot of his work on his behance account.
- Aaron Nace: Photographer, photoshop artist and instructor (he has quite a few courses phlearn which you can check out here). His work is really good and worth a look at. The plus is that if you like his style, you can take one of his courses and see how he does it. You can see a lot of his work on his flickr account as well.
- SeventhStreet Studio: This is a photography/design studio that seems to specialize in photo composites and also the mixing of photography with 3D rendered elements. There’s a lot of great examples of photo composites in their portfolio.
Bonus File
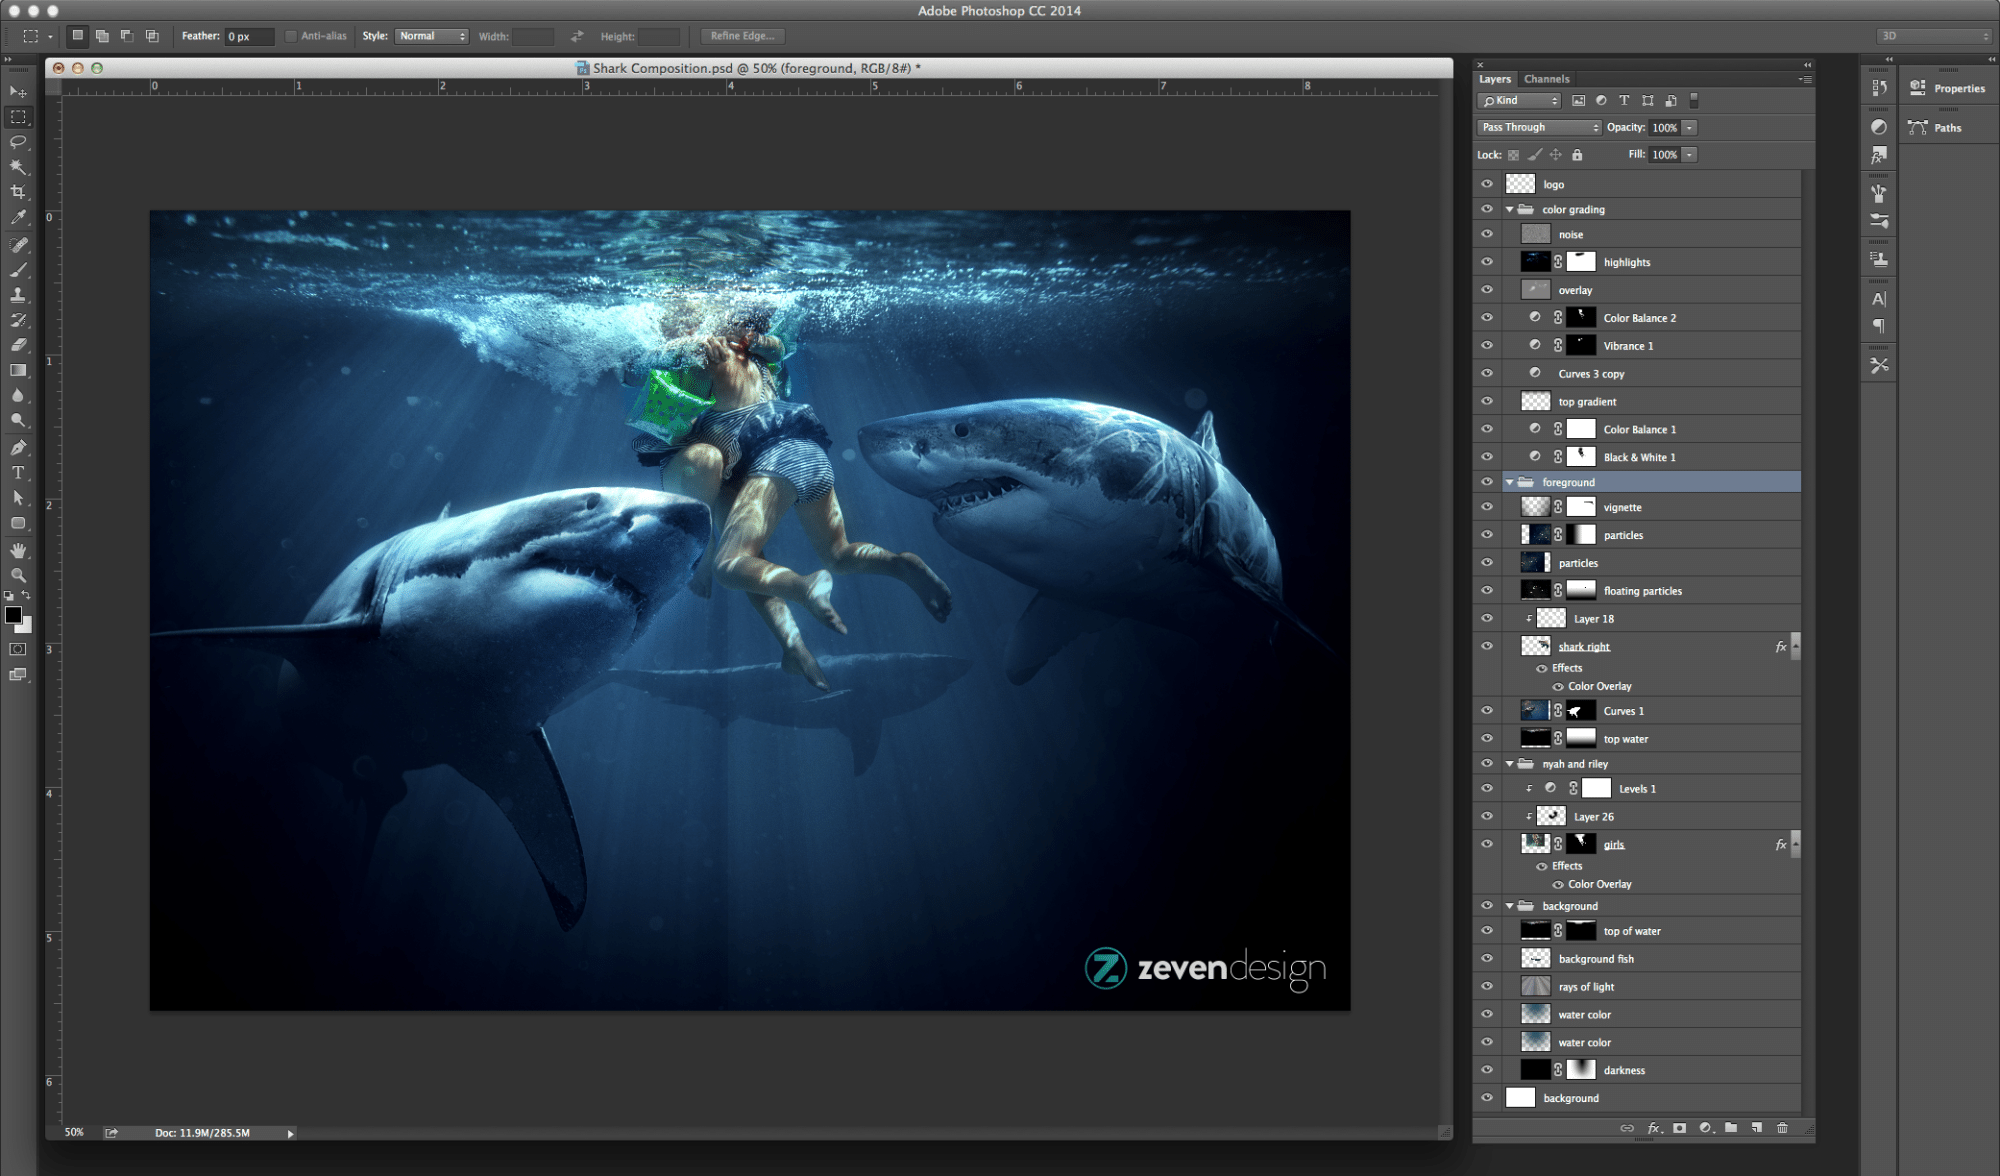
I’ve included a layered file of the Shark Composition I did. I used a photo I took of my daughters along with stock photos of sharks. By looking at the file in Photoshop you can see the various principles above in application. You can see how the file is layered. This is probably not the cleanest composition file and there are certainly better photo composite artists out there (see list above), but I always find it very interesting to look “under-the-hood” and take a peak at the workflow of other designers. Hopefully this bonus file will allow you to do that.


This article is perfect! Thanks for sharing great tips and ideas that can help improve our skills. I can’t wait to apply all these techniques in my compositions.
This is a very good article! Thanks! Pics are great!